The content of the article
How to polish your headlights with your own hands? Not easy. But it is quite feasible if you have all the necessary materials and a place to do this. You will not do polishing right on the street. Still, this is not a pure occupation. Dust flying in all directions, pieces of abrasive ... Plus then, for finishing, it is necessary to completely eliminate dust particles in the air. Otherwise, all the work will be in vain. But first things first.
Why is headlight polishing necessary? The new car does not need it at all. But a typewriter that has already rode on our roads for at least two years is necessary. Now most cars are produced with plastic headlights. Despite the protective coating, grains of sand and small stones flying from under the wheels do their insidious business. They leave micro scratches on the surface of the plastic, which are initially invisible. But over time, the headlights become dull. Troubles are added by chemicals on the roads and oil from the exhausts of other cars.
Everything would be fine, but defocusing occurs. That is, instead of a directed stream of light, a blurry spot is obtained. And this can lead to undesirable consequences. After all, such muddy headlights begin to glare. They catch the glare of the light of oncoming cars and return them to the road in front of you. At some point, this will cause an accident.
How do you know if your headlights need polishing? Very simple. In the dark, shine on a flat wall. You should get a clear circle or oval. If the edges of the spots are blurry, then it's time to refresh the eyes of your car.
What are some ways you can polish your headlights yourself? Without recourse to professionals, there are only three of them:
- Minor scratches. Polishing with a special tool or paste.
- Medium scratches. Manual grinding.
- Deep scratches. Polishing with a special set.
All methods have proved to be equally well provided that they are executed correctly and can save a significant amount. The main thing is not to rush and methodically implement the recommendations. Consider each option in detail.
Minor scratches
If you do not start the headlights before severe turbidity, then it is quite possible to handle manual polishing using special tools. These are pastes that can be bought at any parts store. By the way, the remedy with a turtle on the label proved to be quite good. The second most popular is GOI paste. Some literate people write and say GOA. Well, yes, everything is right - State Optical Institute. Okay, we will not portray the grammar-Nazi, that's not the point. A third remedy is available to everyone and is available in any home. This is a regular toothpaste. Not a powder! It also contains fine grinding abrasives. But the powder is large abrasive.
For polishing you will need:
- selected medium
- soft rags
- non woven napkin
- polish
- masking tape
- dishwashing liquid, water
- gloves
Getting down. First, thoroughly rinse the headlamp with water and dishwashing liquid. This will allow maximum degrease and clean the surface. The fact is that this method is gentle. It only polishes tiny scratches on the surface of the protective varnish. We do not touch the plastic itself.
Dry the headlight with a non-woven cloth. She leaves no fibers. Now we take masking tape and begin to glue. We seal everything where the remedy can get, and even more. Because waving a rag, you can inadvertently scratch the paintwork of the grille, hood and bumper. Therefore, we close everything. Just do not take ordinary tape, otherwise you will remove it with paint. Or then you have to tear off pieces of the adhesive base.
So, everyone closed.We put a little of the chosen product on a rag and begin to polish the headlights in a circular motion. Do not press hard. Will have to rub for a long time, 7 minutes for sure. Some sources recommend taking a sponge. What for? All the paste is absorbed into this very sponge, what will the headlight remain there? Others advise doing only reciprocating movements. No, have you ever seen how a polisher works? Only in circular motions, otherwise there will be longitudinal and transverse stripes.
How to understand what is already enough and you can finish polishing? Purely visual. With a dry cloth we erase the remnants of the product, then we look at the headlight. It is advisable to do this in natural light, but not in direct sunlight. Do you like the result? That’s enough. Not? Three more for a while.
As soon as you start to like your headlight, remove excess paste. Then we put a polish on a clean rag, rub the eye of the machine to a shine. Now we are moving away, admiring our work. Next, repeat everything with another headlight.
Medium scratches
This refers to those of medium depth. That is, the lacquer coating is scratched through and the plastic is slightly touched. Here, just pasta is indispensable. Have to pick up sandpaper. Only not the one that you rub metal parts in the garage! A special fine grain. In this case, one kind can not do.
Take at least 4 species, ranging from 600 to 2500, with approximately the same pitch. For example, another 1200 and 1800 grit. This is the most optimal and least traumatic for the headlamp surface.
It is desirable that the sandpaper was on a fabric basis. It is much more convenient than paper and tears less. Just do not soak it in water, as some advisers recommend. What will it give? Does the fabric swell? Or will sandpaper grains get better? Soaking gives nothing. But periodic washing off with sandpaper gives a very high-quality polishing result.
Preparatory procedures are exactly the same as in the first method. This washing, wiping dry and pasting adjacent surfaces with masking tape. But then the differences begin.
When using sandpaper, polishing or abrasive paste is not needed. Each type of skins work no more than 7 minutes. In this case, the resulting slurry must be washed off of the dust about once every 35-40 seconds of work with the used paper. The headlight itself is washed with clean water after each change of the skin to a smaller one.
After the final grinding, again you need to take a polish and soft rags. You can and foam. Now finally polish the headlight clean. Top it is desirable to cover with acrylic varnish, it is inert to plastic. True, you need to have coating technology so as not to spoil all the beauty. Even the smallest particles of dust adhering to the surface of the varnish during drying will create relief and dullness. Therefore, it is advisable to entrust this procedure to a specialist, or to someone who already had similar experience and knows all the application technology well.
Deep scratches
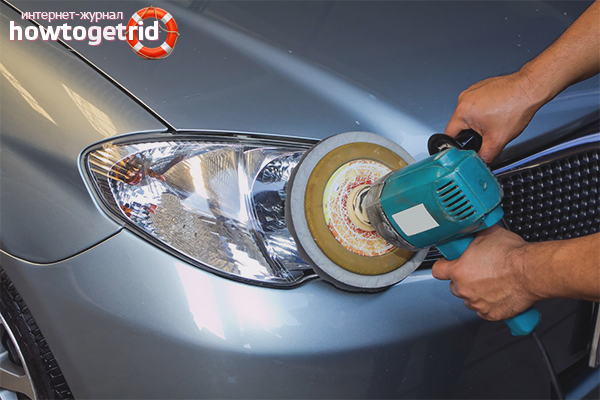
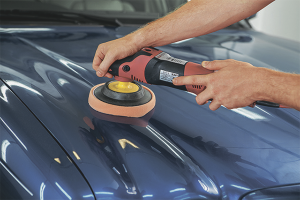
Manual grinding can no longer cope with them. Have to pick up a grinder. But it’s so easy for her not to overcome deep scratches on the headlamp. What to do? Today, the industry offers special polishing kits. They are freely sold in parts stores. Includes several circles with Velcro for easy mounting on the grinder. They have different grain sizes to achieve the best result. Some craftsmen manage to use a conventional drill with a nozzle instead of a grinder.
Detailed instructions are always written on the packaging of the kit. We recommend you follow it for sure. It varies slightly from each manufacturer. The largest number of positive reviews received Abralon and repair kit from 3M. They are most convenient to use.
In general, the point of the whole procedure is to gently grind the headlamp surface with a special circle.Start with the largest grit, finish with fine. Do not mistake! In numbers, it's the other way around. For example, start at 600 grit and end at 4000 grit.
The most important step is the first sweep. You can not put pressure on the grinder, the headlight may just burst. Smooth movements achieve the most even and matte surface. The final look of the headlight depends on this. Because the rest of the circles no longer remove the bumps. They polish what you did in the first round.
We recommend periodically washing off the dust from the surface of the circle and moistening it with water so as not to dust on the sides. And yet, constantly check the plastic for heat. It’s better to let it cool slightly than to admire the crack. For the same reason, we recommend working in one circle for no longer than three minutes in a row.
After polishing with the last round of the finest grit, you can proceed to the final polishing of the headlights. But before that, it is necessary to wash the plastic with clean water and pat it with a non-woven cloth. By the way, the most ordinary water will help determine the correctness of your actions. If you did everything right, then the water will drain from the headlight, as if it is greased.
Now you can finish. Polishing does not have to be done with a grinder. It is enough to apply it on a soft cloth or piece of foam. And polish the headlights with pens. It would seem that everything is ready. You can safely ride. But without a protective lacquer, the plastic will soon cloud again.
No, of course it is understandable: polishing wheels can be used up to 10-12 times, they are quite inexpensive. But after all, they can be used for 20 years for 10 polishes, or they can be thumped in a year. This is if you do not cover the headlights with a finish varnish. Therefore, we recommend that you do not neglect this procedure. In addition, the varnish prevents yellowing of the plastic from sunlight.
Tip. To keep your car's eyes always shining, polish them at least once every two years.
Some tips
- If you are going to polish your headlights for the first time, then take your time. Ask someone to help you. For example, a friend who has already carried out such a procedure on his own. There is no such thing in the immediate circle? Surely there is an old headlamp in stocks that seems to be no longer needed, but throwing it away does not raise the hand. Here on it and practice. It turns out - feel free to proceed to the headlights of the car.
- All of the above procedures apply to plastic headlights. In order to polish glass headlights, slightly different materials are used. That is, you cannot cure them with toothpaste. But GOI paste or abrasive compounds based on ceramics or diamond dust - quite.
- When polishing glass headlights with a grinder, you need to constantly water them. For example, with one hand you are driving a tool, the second you constantly scour from the spray gun. Or ask someone to help you. Otherwise, swallow glass dust. Comes into the eyes - also pleasant is not enough.
How to polish your own headlights at home? Why at home? After all, these are specific odors, dust from grinding, particles of abrasive paste flying in all directions. Do you need it? Polish in the garage. There you can safely litter. Not sure of your abilities? Turn to professionals. For a very affordable price, the eyes of your car will sparkle and sparkle with light.
Video: polishing headlights in 5 minutes with toothpaste and brush

Submit